
JetSki Solutions - Installation Instructions >
Billet Mixture Knob Installation
1. Remove high and low mixture screws.
2. Clean out female threaded holes in the carbs with pipe cleaner soaked with acetone.
3. Remove all parts from the mixture screws, and keep the parts on a piece of paper marked with what needle they came from.
4. Clean any paint off the needles, and remove any roll pins (T handles)
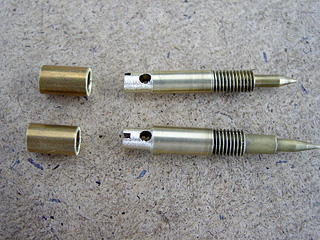
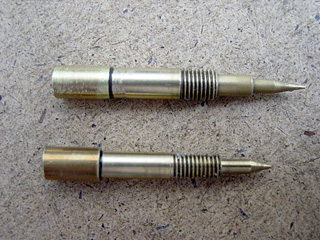
5. Check the fit of the brass adapter sleeves on the ends of the needles. If they do not slip on easily, file down the ends accordingly.
6. Install the brass adapter sleeves onto the ends of the needles using JB Weld or similar two-part epoxy. The high-speed needles will be cut and dry��the brass sleeve will bottom on the raised ring (spring stop). The low speed screws may or may not have this spring stop�..Many late model carbs have no stop and the spring stop is the T handle itself. If your needle has the raised ring, just install the same as the high speed, if not, install the brass sleeve so the hole where the cross pin was is just visible. NOTE: It is best to install the brass sleeve into the knob, lightly tighten the set screw and dry fit the knob onto the low speed screw installed and fully closed (on the carb) to obtain the correct positioning. With the needle closed, both the low and high knobs should be approximately 1/32 inch away from the shroud around the needle hole. With the knob dry fit this way; mark the low speed screw with a scribe so you can attach the brass sleeve at the correct depth.
7. Wipe off any excess epoxy before it sets with acetone. None should be showing on the brass sleeve or needle!
8. Allow to set for 5 hours or more.
9. IMPORTANT: We have found that Mikuni has used several suppliers for springs, and some are weaker than others. Stretch each spring so it is 1/8 inch longer. This will prevent the needle from vibrating loose.
10. Install the springs, washers and O rings. NOTE: on the newer low speed screws with no raised shoulder, BOTH aluminum washers install after the spring, followed by the O ring.
11. Apply a very tiny wipe of plumbers silicone grease or similar to the O ring and install the screws. You may have to temporarily install the knob to assist in fully seating the needle.
12. With the needles fully seated, install the knobs, making sure they are fully bottoming on the brass sleeve, and turn so all black lines are straight up (12 O�clock)
13. Apply blue loctite to the setscrews and tighten. Do no overtighten.
14. Back the high-speed screw out 3 turns and ensure it is fairly tight. If not, remove and stretch the spring again, or install an additional washer of the correct size. Most high-speed screws are set � to 2 turns out. If you must run yours at 3 (max fuel delivery), we highly recommend going up one or two jet sizes, since you are probably too lean.
15. Most low speed screws are set � to 1 � turn out, and you should not have any problem with the screw being loose. But again if it feels too easy to turn, stretch the spring again.
16. Dial in your original setting and go ride! Stop after 5 minutes and check to ensure the screws are staying adjusted. NOTE: Our kit does not alter the original spring location, but the very slight added weight on SOME springs on certain model year carbs could cause them to vibrate loose. It is the owner�s responsibility to ensure the units are installed correctly and springs adjusted to compensate. Many of these have been installed WITHOUT and spring stretching and work perfectly and never budge, but we have found a very small percentage that did (even then only one or two out of four), so monitor carefully for the first two or three tanks.
Please contact us with questions or for assistance.
